
Short story of my experience working with wigs on a movie set
How I create FX looks with Beard stipples and creating period hairstyles with wigs. My experience about working with Human, Synthetic & Animal Hair and their benefits.
There are 3 Popular Wig and Facial Hair Types, Human, Synthetic and Animal hair.

There are 3 main different wig and facial hair types, human, synthetic and animal hair.
Human - Synthetic mixed hair pieces and wigs are very popular these days, they are not crazy expensive as 100% human hair wigs and can look natural on camera, some can even be styled with hot styling tools (reading instructions and descriptions before shopping your wig or hair piece is extremely important!) Before applying a wig on someone, I made sure the wig is first of all clean, washed and sanitized (inserted Wig Cap). Mattifying hairspray or Dry shampoo helps to take off the shine of synthetic wigs.

While On-Set in Cincinnati - Ohio, I could learn so much about Wigs - preparation, installation and the styling process.
When you work with 10 other hairstylists in a room for months, you have the opportunity to learn endless skills not just with your eyes how other stylists create their looks but when there is a little downtime and everyone can sit down to share all their tricks they gathered over the years, that is so inspiring! You get free learning lessons and you can take out what's most beneficial for you in order to become better and better in your profession.
Step By Step Process
1 - The Hair Wrap
I part the hair into 3 sections, 2 sections on each side (ear to ear) followed by parting the middle of the back section of the head right at the middle vertically from the apex ( crown area) to the neck area. Twisting each hair part separately into flat round tails and clipping each part smoothly onto the scalp.
If the hair is long and thick, I recommend to do small subsection at every main section to have more control over the overall hair and to guarantee a long lasting secured effect.
The hair can also be braided all over the head instead, most important is to flatten the hair as close to scalp as possible and to pin the hair with small or medium Wig clips.
The little flyaways can be sprayed down with glue Got2b hairspray and clipped in the Apex direction. Gafquat is one popular product used for flattening baby hair around the hairline or for general all over flattening of short hair.
2 - Now you can pick a cap (I recommend a breathable HD Cap)
which will help as a protective barrier between the person's scalp and wig and also for supporting to keep the wig in pace.
It depends on the wig type you are going to use, there are a few basic options - A cap wig, capless wig or lace front wig.
3 - The next step is to apply the wig of your choice.
I used a laced front wig, an adhesive is required to attach a laced front wig. My favorite lace adhesive is the Mehron Matte Spirit Gum or the K.D.151 (Extra strength and ultra matte lace adhesive).
There is also the option to use double sided lace tape, it is a fast application process and easy to remove. It depends on the preferences of the artist but also if the person has for example an a allergy to the regular liquid glue, having wig tape in your kit is a smart back up option.

4 - Now it is time for the fun and creative part - Styling the Wig.
For the movie, we, the hair department team worked on Period hairstyles from 1920s-1970s. Research is very helpful and my Pinterest account is full of all different inspiration photos. I still find it so impressive how much time the ladies took back in time to create these beautiful hairstyles, especially the 1920's & 1950's hairstyles are so appealing to me.
Nowadays nobody has the time anymore to sit down for hours and creating a specific hairstyle just for everyday life situations. Wig's started becoming popular in the 50's since the woman started not wanting to spend so much time on hair anymore.
We have luckily wonderful tools these days which create super fast hairstylings. GHD Hair sells my favorite hair curling and straightening wands, their quality is unbelievable good, I have GHD styling tools for over a decade now and they still work fantastic!
For longevity hairstyles on-set, we used instead hot rollers in different sizes & shapes. Not to forget, using a thermal styling spray makes a big difference on longevity hairstyles too, spraying on each hair strand before rolling the hair onto the roller, gives the curl more hold and helps to keep the hairstyle in shape when brushing out the curls. Hair nets, to keep the hairstyle in place is such a smart tool but go for the invisible ones > Hair Beauty Supply Stores or Sally's have a nice sortiment available, matching to the hair color.
Kenra Styling Spray 19 - is my go to! The alcohol content should be the first ingredient, the more alcohol in the styling spray, the better "crisp" it gives the hair but a light hand with it and just a fine spritz is key!
5 - THE FINAL STEP - Shaping and Sealing The Hairstyle.
Brushing/ Combing out the curls with a big static free bristle brush and a teasing brush (Mason Pearson Nylon Bristle Brush).
Sebastian Shaper Medium - is one of the "fine mist" hairsprays which I find best since it is lightweight, it doesn't weigh down the hairstyle at all, what is important if you need longevity, especially on set. For updos I like to use Matte Bobbi Pins instead of the shiny ones, they don't reflect that much on camera. The MWS Shop - Manhattan Wardrobe Supply has great options from short - long Bobbi and Hair pins in matte - grey, blonde to black.

Facial Hair application with YAK hair
Why Yak Hair? I like this hair variant, the texture is very similar to human hair due to the natural curl.
For fake beards or eyebrows it looks really authentic and the Pam London (Precious about Makeup) Shop has all the beautiful natural hair colors in short and long versions available. Crepe hair is a nice substitute for training situations or if you work on a low budget project.
Yak Hair

Crepe Wool

Synthetic Hair

Step By Step Application how to create a full beard with Yak Hair
1 - Applying matte adhesive or thicker Pros aide to clean skin on the desired beard area with a glue FX brush or disposable sponge.
2 - Now, laying down a medium hair strand, starting in the middle part of the desired placement by using a metal spatula or similar tool then pushing hair carefully onto the skin with in an "up' motion to create a natural hairline edge.
The upper beard edge line needs only a few hair layd down for a natural growth look, the darkest and fullest part of a beard is the middle area.
3 - After completing laying dow all hair strands, cutting or thinning the hair in shape if needed.
4 - Spraying carefully water mist on the beard (yak hair) to enhance the natural curls, waiting a few moments until the curls show completely then combing and pushing the hair in the desired form.
5 - Letting it Air-Dry if possible or using a mini fan helps to speed up the overall drying process.
Tip - If the pre-applied adhesive still shines through the hair, it can look obvious that this is a fake hair application. > To avoid this, Mehron Mattifying Gel comes in different color tones and can be applied with a small brush to fill the shiny gaps.
| Side Note I will insert photos of the application process soon when I'm creating a Cowboy look on my model, see you later ;) |
Stipple Beard Application
Preparation: Cutting synthetic or Crepe wool hair of desired beard color into really tiny small stipples until it looks and feels like soft "wool'.

Step By Step Application with Kryolan stipple wax + Synthetic Hair

1 - Applying matte adhesive on desired stipple placement or taking some Kryolan stipple wax with a metal spatula and spreading on desired beard area with brush or a Q-Tip.
(Stipple wax works also great if you like just to fill beard gaps or if you only need a quick beard "fill" on set. (Applied with an adhesive gives a more long lasting effect).
2 - Taking some beard stipples from the metal plate with a slightly wet brush or a Q-tip.
3 - Pressing softly beard stipples onto skin
4 - When finish with filling in the desired areas and you recognize any shine between the beard hair - mattify any shiny gaps with e.g. Mehron Matte Gel,
Et Voilà - Your fake stipple beard is camera ready!
Before
Natural Hair Growth, No Product applied!
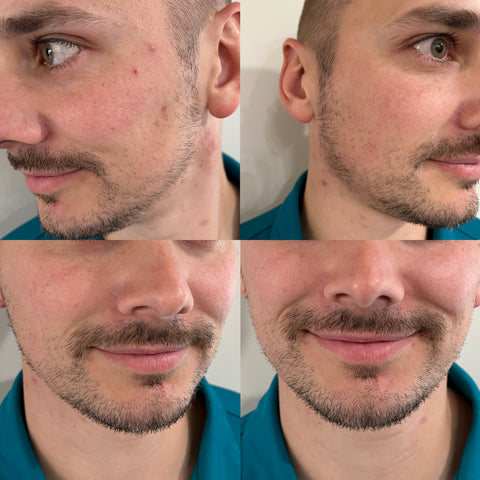
After
Left Face Beard Stipples applied with Q-tip + Kryolan
Right Face - Stipple Wax PPI Skin Illustrator Glazing Gel "Character 2" + PPI Pam London "On Set Really Useful Hair Palette" applied with Bdellium stipple brush and a stipple sponge

|
Side Note
- To achieve a fast stipple beard look without using FX hair - Using Skin Illustrator Glazing Gel (facial skin friendlier than regular alcohol activated palettes) in your desired beard color applied with a stipple sponge or stipple brush (available on Amazon or FX Beauty shops) on desired beard placement - Finish.
|